There are three connection types to connect your network camera to Internet: by Static IP, PPPoE, and DHCP. Each type requires different configurations.
Static IP:
Get the information of “Server IP”, “Gateway” and “Net Mask” from your ISP (Internet Service Provider).
Or, if you’re using a router, please get information from the settings of your router.
PPPOE:
a). Get the user name and password for Internet access from your ISP.
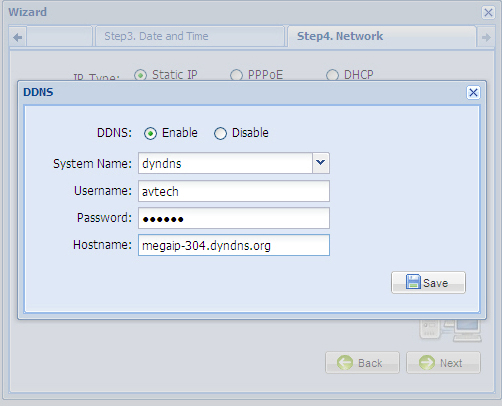
b). Create a DDNS domain name for easy access to your network Camera. For DDNS settings, please see "4-4-1 DDNS setting".
DHCP:
a). Create a DDNS domain name for easy access to your network camera. For DDNS settings, please see "4-4-1 DDNS setting".
b). If your network camera would be attached to a router, it would be better to assign a static IP address to your camera by configuring port forwarding. For details, please see "4-4-2 port forwarding".
We strongly suggest you to use our “Wizard” to setup your network camera. It could help you to finish all major settings step by step.
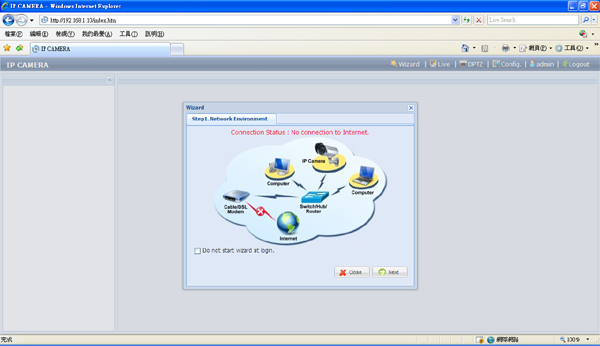
3-2-1. Network Environment
In “Network Environment”, it shows the network connection situation of the network camera. If your network camera is connected to a computer directly as instructed above, the status would be “No connection to Internet”.
Then, click “Next”.
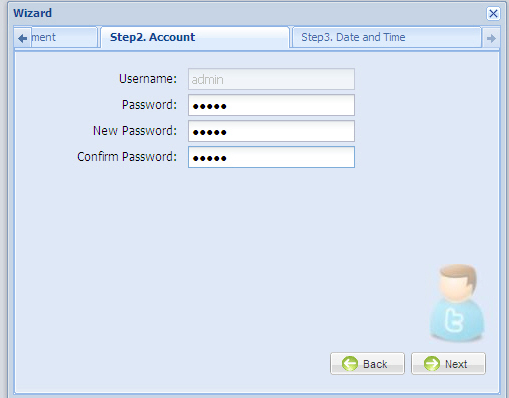
3-2-2. Account
Set the password here. We strongly suggest you to change the default password “admin” to your own password.
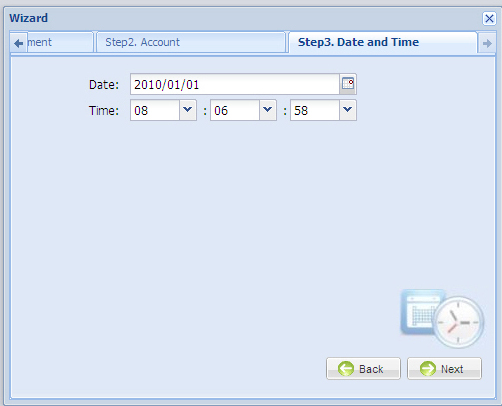
3-2-3. Date and Time
Please check the date and time
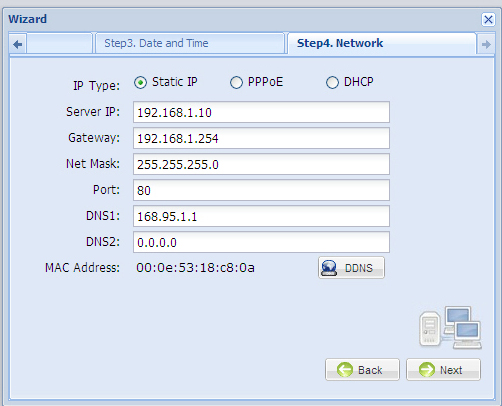
3-2-4. Network
Check your network environment, and choose from STATIC IP, PPPOE or DHCP to connect your network camera to Internet.
For Static IP:
a). Select “Static IP”. Enter the information of “Server IP”, “Gateway” and “Net Mask” obtained from your ISP (Internet Service Provider) or from the settings of your router.
b). Enter the port number. The valid number ranges from 1 to 9999. The default value is 80. Typically, the TCP port used by HTTP is 80.
If your network camera is attached to a router, it is better to set port forwarding on your router. For port forwarding settings, please see "4-4-2 port forwarding".
For PPPOE:
a). select “PPPOE”. Then, enter the user name and password obtained from your ISP.
b). For PPPOE users, we strongly suggest you set a DDNS so you could connect to your network camera easily. Press the “DDNS” icon and enter the information you used when you subscribe the DDNS service. For DDNS settings, please see "4-4-1 DDNS setting".
For DHCP:
a). Select “DHCP”. Your network camera will get an IP address for Internet access automatically.
b). For DHCP users, please remember to set DDNS. Press the “DDNS” icon, and enter the information used when you subscribe the DDNS service. For DDNS settings, please see "4-4-1 DDNS setting".
c). If your network camera is attached to a router, it would be better to assign a static IP address to your network camera by configuring port forwarding. For details, please see "4-4-2 port forwarding".
DDNS
It would be more convenient to connect the network camera to Internet by setting DDNS when you’re using a dynamic IP address, like PPPOE or DHCP. Our network camera supports major DDNS service providers. You can enter your domain name to connect to your server no matter what your IP address is.
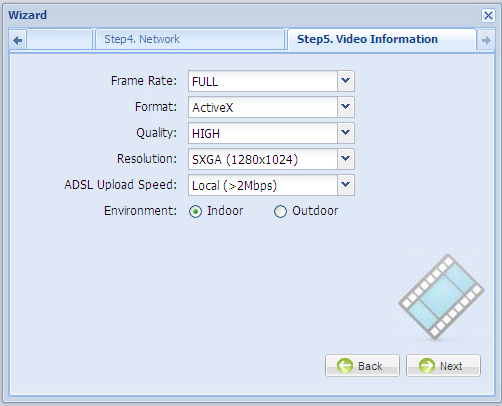
3-2-5. Video Information
You can adjust some basic video settings here.
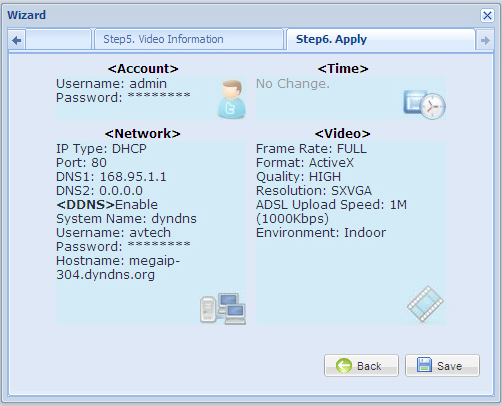
3-2-6. Apply
Please check all the settings you changed. The network camera would save all changes and reboot after pressing “Save”.